| Get
Your Mail Messages Organized 7 |
February
28, 2002 |
|
|
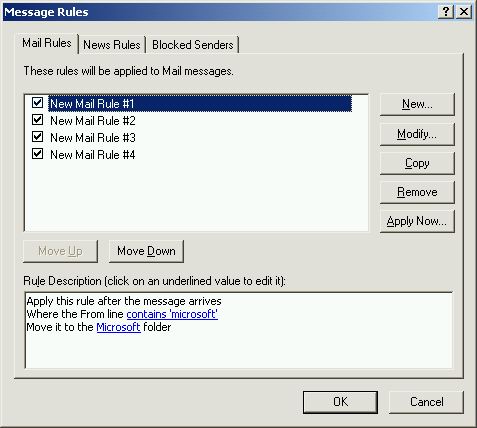
If you are using Outlook Express then you have an excellent
method of organizing your incoming messages called Rules. Message
Rules for Outlook Express can be found from Tools>>Message
Rules>>Mail tab.
There is one special rule that many may use and ignore the
others. This is the Block Senders List. All you have
to do is provide the e-mail address and Outlook Express
will automatically put the offending message into the Deleted
folder. To add to the Block Senders list go to Tools>>Message
Rules>>Block Senders List and click the Add button.
Now just input the e-mail address. Done.
Remember this is the same as using the Delete message
action. Better yet you could have used Do Not download it
from Server and Delete It From Server actions. Using
these two actions
will keep the message from ever getting to your workstation.
|
| Get
Your Mail Messages Organized 6 |
February
27, 2002 |
|
 |
| Message Rules |
If you are using Outlook Express then you have an excellent
method of organizing your incoming messages called Rules. Message
Rules for Outlook Express can be found from Tools>>Message
Rules>>Mail tab.
The order in which the Rules are executed on a message make
a difference. For example WindowsAssistance.com receives several
different newsletters from Microsoft. Most are sent to one folder
(call it folder A) but a couple of them are sent to other folders
(call them B and C.) If the Rule for the moving messages to
folder A was executed before the rules that sent messges
to folder's B and C then no Microsoft messages would never get
to folder's B and C. So order counts. To rearrange rules you
have the Move
Up and Move Down buttons.
|
| Get
Your Mail Messages Organized 5 |
February
26, 2002 |
|
|
If you are using Outlook Express then you have an excellent
method of organizing your incoming messages called Rules. Message
Rules for Outlook Express can be found from Tools>>Message
Rules>>Mail tab.
It would be nice to see all of the Outlook Express Rule
conditions and actions listed in one place. So be it. Here
they are.
|
| Get
Your Mail Messages Organized 4 |
February
25, 2002 |
|
 |
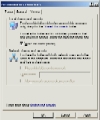
| fig. 1 |
 |
| fig. 2 |
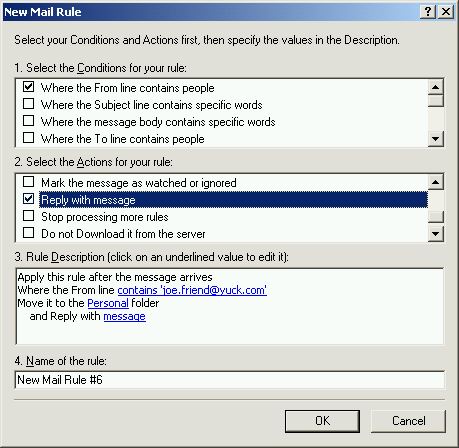
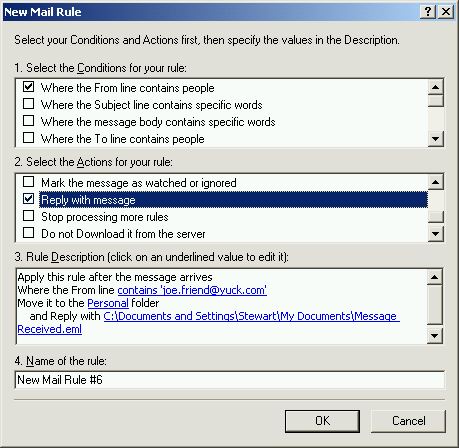
If you are using Outlook Express then you have an excellent
method of organizing your incoming messages called Rules. Message
Rules for Outlook Express can be found from Tools>>Message
Rules>>Mail tab.
In our previous tips we created some message folders to put
our incoming mail into and introduced you to message rules and
created a rule to store specific messages into a folder. Now
lets send an automatic reply that you received their message
and will get back to them.
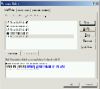
We're going to add a reply to the rule we created in our previous
tip. Before we can add a reply to the rule we need to create
a reply message. In the new message include a subject and a
message and then from File>>Save As you can save the reply
message. Once you have a reply message go to Tools>>Message
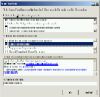
Rules>>Mail and select the rule you wish to add a
reply message and click Modify. In the #2 window check
Reply
to message (fig. 1). In the #3 windows double-click
message and select
the message (fig. 2) you created earlier. Done
|
| Get
Your Mail Messages Organized 3 |
February
22, 2002 |
|
 |
 |
| fig. 1 |
fig. 2 |
 |
 |
| fig. 3 |
fig. 4 |
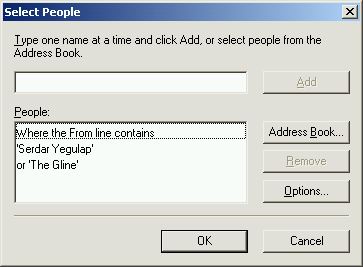
If you are using Outlook Express then you have an excellent
method of organizing your incoming messages called Rules. Message
Rules for Outlook Express can be found from Tools>>Message
Rules>>Mail tab.
In our previous tips we created some message folders to put
our incoming mail into and introduced you to message rules.
We will now create a rule to store specific messages into a
folder.
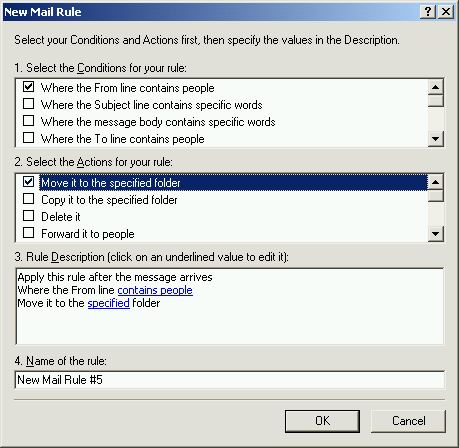
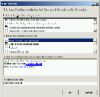
In our last tip we got as far as the New
rule window. In most cases we will select the sender
in the condition box and select Move to a folder for
the action. But you you use any field of a message for the condition.
And as you can see from the actions you can also delete mail,
copy messages, forward the message and many other options.
An important note is that you are not restricted to using just
one condition and action. You can select multiple condition
and actions. You can also select multiple destinations for each
action.
For instance you may move all messages from friends to one
folder and send a reply that you received their message and
will get back to them (We will do this in the next tip.)
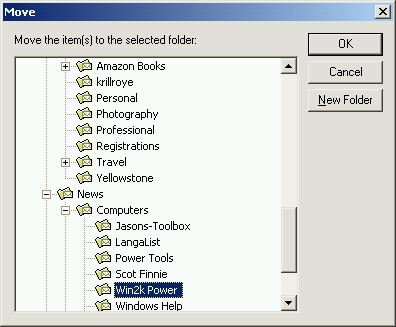
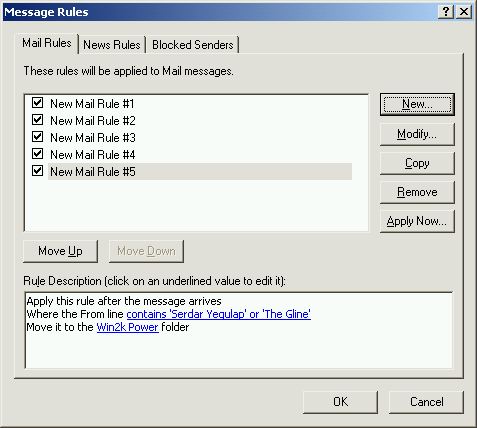
For this tip we selected an e-mail (fig.
1) that we get every week, the Win2KPowerUsers newsletter
(fig.
2,) and move it to it's own folder (fig.
3.) fig.
4 shows the completed rule. Notice we have more than one
sender name. We also could have used the subject win2kpowerusers
that shows up in every newsletters subject heading no matter
the sender.
|
| Get
Your Mail Messages Organized 2 |
February
21, 2002 |
|
|
 |
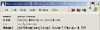
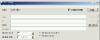
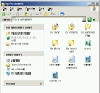
| List of Message Rules |
Create rules window. |
If you are using Outlook Express then you have an excellent
method of organizing your incoming messages called Rules. Message
Rules for Outlook Express can be found from Tools>>Message
Rules>>Mail tab.
In our previous tip we created some message folders to put
our incoming mail into. Now lets setup the rules that will move
mail into the newly created folders. Open the Rules windows:
Tools>>Message Rules>>Mail tab. Click the
New
button. The top pane is a selection of conditions that determine
what messages to select. The middle pane is a group of actions
that that can be used on the message. And the bottom pane is
where you setup the details for the conditions and actions of
a message.
Next tip we will setup the rules for an incoming message.
|
| Get
Your Mail Messages Organized 1 |
February
20, 2002 |
|
|
If you are using Outlook Express then you have an excellent
method of organizing your incoming messages called Rules. Message
Rules for Outlook Express can be found from Tools>>Message
Rules>>Mail tab.
Before we start you must first create some Mail Folders
to put your incoming mail into. Select Local Folders,
right-click, select New Folder. Name the new folder.
You can organize your mail just as you would your other data.
All mail folders can contain data (messages) and additional
folders.
Tomorrow we will create message rules to move messages automatically
into a folder when the message is received by Outlook Express.
|
| Find Message |
February
19, 2002 |
|
 |
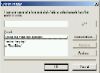
| Outlook Express Find
Message dialog box. |
Outlook Express has the ability to find a message using many
variables. If you know the message is in a specific folder then
select the folder and from the Edit menu select Find>>Message
In This Folder (Shift+F3.) If you have no idea where the
message is then select from the Edit menu Find>>Message
(Ctrl+Shift+F3.) You can then you the Browse button to
specify a folder or just select Local Folders and check
the Include Subfolders box and search everything.
|
| Play
Games Online |
February
18, 2002 |
|
|
Tired of single-player computer games? Windows XP comes with
five Internet games: Backgammon, Checkers, Hearts, Reversi
and Spades. Where do you find other players? All
over the world.
Select Start, All Programs, Accessories, Games and choose
one of the five Internet games mentioned above. Click the Play
button, and wait as you're connected to the Internet game server.
Before you know it, you're paired up with a player of the same
level.
|
| PicaView:
Windows Explorer Add-On |
February
15, 2002 |
|
| From WUGNET: PicaView
is a Windows Explorer add-on with all the functionality of an
image viewer and movie viewer from the right-click menu. You can
even right-click audio files to hear them instantly! |
| Burn A
CD |
February
14, 2002 |
|
| Windows XP has the ability to burn
CDs built-in. Just insert a blank CD into the CD-R or CD-RW and
used the Send To command under Properties to collect all the data
you want burned to the CD. The data is not yet on the CD, it is
just been collected so a one time burn can be done. Once the data
is collected go to the CD icon and click the task Write these
files to CD, which starts the CD Writing Wizard. The wizard
will guide you through naming the CD and writing your files to
the CD. |
| Turn
On the Sticky Keys Feature |
February
13, 2002 |
|
|
If you have trouble holding down two or more keys simultaneously,
activate StickyKeys.
To activate StickyKeys: Press the Shift key five times.
A dialog box opens with instructions on how to set up the StickyKeys
feature.
If you click OK, an icon (a group of squares) appears
in the notification area.
To turn off StickyKeys, press the Shift key five times.
|
| You
Made It Private, Now Make It Secret |
February
12, 2002 |
|
 |
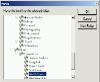
| File and Folder Advanced
Properties |
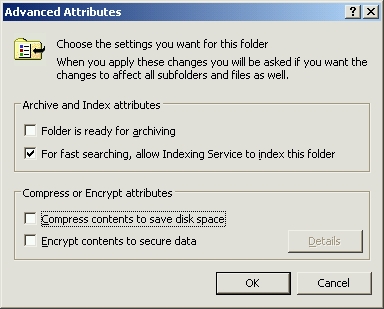
If the data in the now private folder is really private you
might want to encrypt it. First you need Windows XP Pro and
the partition must be formated with NTFS. No small matter there.
To encrypt a folder or file right-click the file or folder
and select Properties. Yes, the Big
Tip. Now click the Advance button. Down at the bottom
you are given the option of either compressing or encrypting
the file or folder. You cannot do both at the same time. To
encrypt check the box next to Encrypt contents to secure
data.
|
| Again,
Marking a Folder Private |
February
11, 2002 |
|
 |
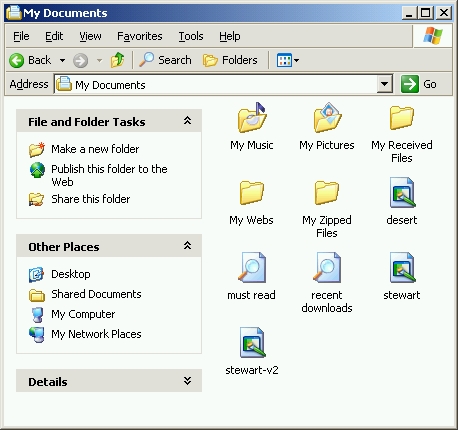
| My Documents folder with
the Tasks sidebar. |
With Microsoft there is always two or more methods for getting
a task done. In our last tip we explained how to make a folder
private. We instructed you to first go to properties for the
folder, then the sharing tab. Well guess what - there is a second
method to get to the Sharing tab. If you have been using
the Tasks sidebar then the Sharing tab is just one click
away. From the File and Folder Tasks click Share this
folder. Done. Now you can make the folder private. Remember
this can only be done if you have formated the partition using
NTFS.
|
| Making
A Folder Private |
February
8, 2002 |
|
 |
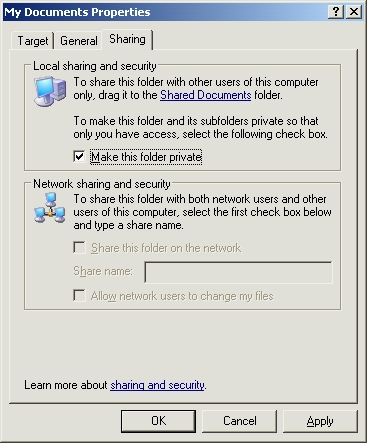
| File/Folder Properties,
Sharing |
If you have multiple user accounts on your system, each user
is assigned his or her own My Documents folder in addition
to the main, or shared, 'Documents' folder. We also mentioned
that by default, any user can access files in both the shared
and personal documents folders. If you prefer to keep others
from viewing your files, mark your My Documents folder private.
Then, no one can get inside but you (unless they log in under
your name -- a good reason for password-protecting your user
account).
Open My Computer and locate your documents folder --
probably C:\Documents and Settings\[your name]\My Documents.
Right-click it, select Properties and click the Sharing
tab. Select "Make this folder private," then
click OK. Marking this folder private marks all subfolders
and files inside private as well.
Note: You can only mark a folder private if your partition
is formatted as NTFS.
|
| Even
The Know-It-Alls Screw Up |
February
7, 2002 |
|
|
Here at WindowsAssisance we have depended on, and relied on,
Canon SLR cameras. No more. Here's why.
WindowsAssistance went to Fry's, a big discount electronics
store, to find a rebate coupon for the Sony CD-RW we purchased
the other day. With the rebate coupon in hand we went over the
the scanner department to see if they had any film scanners.
They did. And just the one we wanted. A Canon FS2710. Cost us
$399. Fair price.
Get it back to the office. Installed the SCSI card and plugged
in the scanner. SCSI card driver installs just fine. Not so
the driver for the scanner. We were hoping one of the drivers
included with the scanner, Win98, Win NT 4, would work. Neither
did. Get on the Web and travel to the Canon site. Download available
software. No drivers are included. So we call Tech Support.
Long distance toll call. There is no driver for Windows XP and
no indication that there ever will be. We are dead-in-the-water.
Uninstalled the SCSI card and all software. Packed the scanner
up and traveled back to Fry's to return the scanner.
Moral: Yea, there is one. Always check to make sure there is
software drivers for the equipment you are buying that work
with your OS. Always check that the equipment you own will work
with the new OS you plan to buy. If neccessary call the company
and make absolutly sure. Finally buy from a store that will
take back the equipment, no questions asked.
|
| Backup
To CD, The Hard Way |
February
6, 2002 |
|
|
If you want to use Backup and save to
CD you can't. You can only save a Backup to a file or tape.
I will say this once and never again: If you save vitial data
to tape you should be sent to a mental institution. In short
- you're nuts to trust tape. One problem is the user doesn't
understand the sensitivity of the tape. It can be damaged very
easy. Tape is very temperature sensitive. Also tape must be
aligned just right in your tape machine. So we say NUTS to tape.
CD is more realiable, cheaper, and a more effricient method
of storing backups. We are now done preaching.
To backup to CD first create a Backup
to a file then write the backup file to the CD. This is a two
step process: Create the Backup. Write the Backup to the CD.
Windows XP has the ability to write to
CDs built-in. Right-click a file you want to write to a CD and
select Send To >> CD-RW. Repeat the Send
To for all files and folders you want to send to the CD. Now
select the CD drive and from the File menu select select Write
These Files To CD.
We recently did a Backup of
our data and then wrote the Backup file to the CD-RW. The backup
file was 696 MBytes in size. A CD will hold 700 MBytes. All
went well.
Can we automate this procedure?
We will find out in a future tip.
|
| WinXP
Pro Compressed Files and Folders |
February
4, 2002 |
|
|
| File and folder Advanced
Options |
With the Professional version of Windows XP users are afforded
an additional option to compress files or folders. To compress
a file(s) or folder(s) go to Files menu and select Properties.
From the General tab click the Advanced button.
You can check either compression or encryption but not BOTH.
With this option you're compressing the file or folder vs making
a copy that is compressed - the zipped file. Once a file or
folder is compressed or encrypted it will show up as a different
color.
|
| Extract
Files From Compressed Folder |
February
1, 2002 |
|
|
Extracting files from a compressed folder is just as easy as
getting them in there. Right-click the *.zip file and select
Extract All. Identify a destination folder (click Browse,
and so on), click Next, then click Finish. As
an alternative, click and drag a file from inside the compressed
folder to another location, then let go.
Much more about using ZIP compression next time.
|
|
|