| Create Compressed (Zipped) Folder |
January
31, 2002 |
|
 |
| Send To Compressed (zipped)
File |
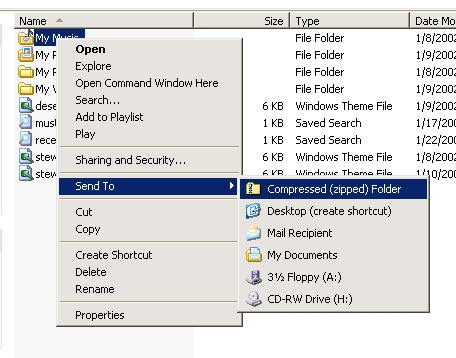
Windows XP includes a compression utility, Compressed (zipped)
Folders, for archiving files and folders. This feature saves
hard disk space by storing data in compressed form, as *.zip
files.
To create a compressed folder from existing files or folders
right-click the selected files or folders and select Send
To, Compressed (zipped) Folder. The Zipped folder will inherit
the same name as the orginal file or folder. If you are compressing
a group of files or folders the zipped file will inherit the
name of one of the files. How Windows XP decides to name the
zipped file is unknown to Windows Assistance. To create an empty
Zipped file - from the Explorer menu bar select File->New->Compressed
(zipped) Folder. Rename the folder.
To add files or folders to an existing zipped folder, drag
them inside. Store the zipped folder anywhere you want, or send
it off to someone else as an e-mail attachment. A recipient
can unzip the file using any unzipping utility.
|
| Chain Hotfixes |
January
29, 2002 |
|
| Microsoft has released a command-line
tool named QChain.exe [57KB] that gives you the ability to safely
chain hotfixes together and to assist with hotfix installations
without requiring multiple reboots. For information about Qchain.exe,
including download, check Microsoft Knowledge Base article Q296861. |
| Security Check |
January
28, 2002 |
|
|
Microsoft released an update to the Network Security Hotfix
Checker Tool (HFNetChk) it first released in August last
year. The new version now includes support for Windows XP.
The tool can be used to assess patch status for the Windows
NT 4.0, Windows 2000, and Windows XP operating systems, as well
as hotfixes for Internet Information Server 4.0 (IIS), Internet
Information Services 5.0 (IIS), SQL Server 7.0, and SQL Server
2000 (including Microsoft Data Engine [MSDE]), and Internet
Explorer 5.01 or later.
You can download this (command line) tool from Microsoft
[255KB].
|
| Open Choices |
January
24, 2002 |
|
 |
| File Types tab |
 |
| Edit File Type |
Scenario: You search the Web everyday looking for good
reads. You save those good reads to your local system for later
reading. Now that you are ready to read the days downloads you
go to My Recent Documents and select an article to read.
Only problem is that every time you open an article it is done
in a new instance of the browser. Depending on the number of
articles you could end up with a lot of open browser windows.
Solution 1: Select a document, right-click and select
Open In Same Window.
Solution 2: When you right-clicked the document one
of the list of choices is in Bold letters. The Bold item
is the default action. When you left-click a document
the system selects the default action. For those HTML
documents it is to start In A New Window. We need to
change the default action to Open In Same Window. To
do this first open Windows Explorer. From the Tools
menu select Folder Options. Select the File
Types tab. Browse down the list of file types until
you reach HTTP Documents. There may be two listings:
One for HTM and another for HTML. We will perform the same actions
on both types. Double-click HTTP Document. Click the
Advanced
button to edit the File Type. Now select Open
In Same Window and click the Set Default button.
Ok, OK, Ok or some number of OK buttons. Now when you double-click
a HTML document it will open in the current or existing Browser
window.
|
| Q Article
Qucikly |
January
23, 2002 |
|
|
In our last tip we mentioned two KnowledgeBase articles. Their
ID was Q310312, and Q253597. Q253597 was the one that gave us
the information we needed to use the setup for Disk Cleanup.
Did you find the article at Support.Microsoft.com?
For this tip we will describe a way to get that KnowledgeBase
article and never use your Web browser. Here's how: Start Help
for Windows. In the Search box put the Q number.
Double-click Set Search Options. Uncheck everything BUT
Microsoft KnowledgeBase. For the product select All
Microsoft Search types. Lastly check Search In Title
Only. Now go back to the top and start your search. The
Help Search should return only one item. That item should be
the Q article we specified. Cool. note: Must be online
for this to work.
If you don't want to uncheck everything but Microsoft KnowledgeBase
then your search will take a little longer but not by much.
|
| Disk Cleanup More or Less |
January
22, 2002 |
|
|
Disk Cleanup has been around a while. For Windows XP go to
My Computer and right-click the disk you want to clean and select
Properties. Under the General tab click Disk Cleanup. That's
it. Or is it?
Fred Langa discussed Disk Cleanup in a recent
newsletter and showed how to get the Disk Cleanup Setup page.
This gives you the ability to specify what you want Disk Cleanup
to remove. Interesting.
WindowsAssistance searches Windows XP Help and finds
nothing about Disk Cleanup Setup. We then go to Microsoft Support
and do a search for Disk Cleanup. We needed to specify a product
so we selected Windows XP. We found a KnowledgeBase article,
Q310312, that discussed Disk Cleanup in Windows XP. No mention
of any setup.
We then returned to Microsoft Support and did the same search
except we specified Windows 2000. The search returned
a different KnowledgeBase article, Q253597. The article DID
discuss using Disk Cleanup setup. Following the instructions
in this article we were able to customize Disk Cleanup for Windows
XP.
Lessons learned. For most utilities that are included with
Windows there is more than meets the eye. And searching Microsoft's
KnowledgeBase it is best to be flexible.
Lastly, we inadvertenly did a search of Windows XP Help while
online and Help returned several KnowledgeBase articles none
of which answered our question. It was only after going directly
to support.microsoft.com
did our search return good results.
|
| What Is The Application Key? |
January
21, 2002 |
|
| Do you have an Application key on
your keyboard? (It looks like a mouse pointer highlighting a menu
command.) Think of it as a right-mouse equivalent. With any item
selected, click the Application key to display that item's context
menu. Or if the focus is on the desktop, click the Application
key to 'right-click' the desktop. |
| What Is NTFS? |
January
18, 2002 |
|
 |
| Disk Management |
For those who move up from Windows 9X
to Windows XP we have a new disk formating method to get used
to. NTFS or NewTechnologyFileSystem.
Should you convert to NTFS or stay with FAT32? What are the
advantages and disadvantages of using NTFS.
For this tip we are going to be a little
lazy. First we used the Windows XP Help system to search for
NTFS. One of the topics returned is titled Choosing between
NTFS, FAT, and FAT32. Give this topic some of your time.
It's a starting point. Second go to Scott Finnie's web site
and read the January
17, 2002, Vol. 2, Issue No. 19 of his newsletter. He has
some interesting info and additional links to more information
about NTFS.
Is your computer already setup with a
NTFS partition? To find out you can go to the Computer Management
console. We mentioned this utility in our last tip but didn't
tell you how to access it. From My Computer right-click
to get the shortcut-menu and select Manage. Once the
Computer Management console opens select Disk Management
- it's under Storage. Viewed
in all their glory are the disk partitions.
|
| Disk Defragmenter |
January
17, 2002 |
|
 |
| Disk Defragmentor |
 |
| Disk Defragmentor Analyze
Report |
For windows 2000 Pro users the Disk Defragmenter will have
a familar look and feel. For windows 9X users it's all new.
After using the defragmenter on both a NTFS and Fat32 partitions
we found it to be faster than the 9X versions. We also noticed
that when you're deframenting the C: partition the program wouldn't
restart itself everytime the system burped. The new view for
past Windows 9X users is also a big improvement.
What's not new is how to start Disk Defragmenter. For
old Windows 2000 Pro users you can go to the Computer Management
Console and start the Defragmenter from there. Or
you can go to Start -> Programs -> Accessories ->
Systems Tools -> Disk Defragmentor. And finally you can
start the defragmentor from Windows Explorer: right-click
a partition, select Properites, Tools tab,
click the Defragmentor button.
|
| Just Delete It, OK? |
January
16, 2002 |
|
 |
| Recycle Bin Properties
Page |
The Recycle Bin is there to protect you from deleting files
and folders by mistake. Because of the Recycle Bin we find it
redundent to ask us if we really want to delete a file or folder
before it goes to the Recycle Bin. We perfer to have it go directly
to the Recycle Bin. Don't ask, just delete it.
Open the Recycle Bin. Right-click anywhere in the Bin. Select
Properties (Hey, the Big
Tip!) At the bottom of the Global tab uncheck
Display delete confirmation dialog. Now files and folders
will go directly to the Recycle Bin.
Each user or account has the option of getting the confirmation
dialog or not.
|
| Create A Boot Floppy Set To Start
An Installation |
January
15, 2002 |
|
|
Win2KPowerUsers
is one of the weekly e-mail newsletters we receive. It is written
by Serdar Yegulalp, once a WinMag.com columnist. His most recent
letter talks about his efforts to get Microsoft to release a
bootable floppy set for Windows XP installation. This feature
had been removed from Windows XP and Serdar was trying to convinced
Microsoft to put it back into Windows XP.
Microsoft was convinced and there is now a download available
at Microsoft
Support. It is a 4MByte download and to create the set requires
6 formated floppies. If you have experience with Windows 2000
Pro you are familar with this utility.
We at WindowsAssistance perferr to do a clean install but that
isn't possible for us because our CD-ROM isn't bootable. So
having the floppy boot utility would have been appreciated.
Now that the utility is available our next WinXP install will
be from start floppy.
|
| Adding Items To Quick Launch |
January
14, 2002 |
|
|
My favorite tool added to Windows 98 is Quick Launch.
Just one-click and away they go. The problem has always been
adding items to Quick Launch. We have now settled on
one method. Simply put we drag items from the Desktop
to Quick Launch. If the item isn't on the Desktop, say
it is in the Start Menu, then we copy the item then paste a
shortcut to the desktop. Once on the Desktop drag to Quick
Launch. You then can delete the item from the Desktop (the
item remains in Quick Launch.)
When you drag an item to Quick Launch you will get a
vertical bar that represents where the item will be placed in
Quick Launch. Move the bar to where you want the new
item placed.
Moving items around in Quick Launch is done just as
you would drag an item. The black vertical bar will show where
the item will be placed.
Remember there is always 10 ways to do anything in Windows.
Another method is from the Start button->Explore.
|
| Give Me My TweakUI |
January 11, 2002 |
|
|
WindowsAssistance uses TweakUI, loves TweakUI, can't live without
TweakUI. View TweakUI.
Most areas of TweakUI are applied on a per-user basis. Some
settings are system wide and can only be changed from an Administrator
account.
- Turn off Ballon Tips. Taskbar
- Keep programs from showing up in the Most Often Used list.
Like ALL of them. Taskbar -> XP Start Menu
- To improve the mouse sensitivity by decreasing the time
the mouse has to be over an object before the mouse is detected.
Mouse -> Hover
- Uncheck everything in General.
- Increase speed at which menus pop-up or open. Mouse
- Get rid of the Shortcut to text whenever we create
a shortcut. Explorer
- There are several special folders, like My Documents.
Their folder location can be change with TweakUI. My Computer
-> Special Folders
To get Tweakui go
to Microsoft and download PowerToys today. TweakUI is part
of PowerToys.
|
| More Than A Task Manager |
January 10, 2002 |
|
 |
| Task Manager |
Task
Manager is more that a listing of currently running
apps. It is also a monitor of system operations. You can examine
running applications and processes, view CPU and memory usage,
LAN traffic as a percent of maxium throughput, including modems,
when in use, and get a list of current users.
To start Task Manager from the Taskbar, right-click
and select Task Manager. You can stretch out the pane
to show a longer timeline.
From the Performance tab, default view, you can observe processor
usage, and check memory usage. Page files are that memory that
is swaped to disk.
If you want to view your internet connect throughput then select
the Networking tab. You and view bytes received, send or total.
The scale for percent of usage, by default, is set to Auto
Scale. Therefore the scale will change depending on usage.
Auto Scale can be turn off from the Optins menu.
For a quick view of what is going on inside Windows XP Task
Manager works well. Get familar with it.
|
| Sending Plain Text or HTML Mail |
January 9, 2002 |
|
|
Outlook Express allows you to send email as plain text or HTML.
HTML is text formated for reading in a browser such as Interet
Explorer. The default setting in Outlook Express is the send
mail formated as HTML. Not all mail readers will know that the
incomming message is formated as HTML and treat it as plain
text. Not good.
To change this setting, and many others for Outlook Express,
go to the Tools menu and select Options. For sending
options select the Send tab. Click the Font button.
Now you can change the text format from Html to Plain Text.
While you're here check out what else is available. For instance
under the Read tab you can select the font style and
size (small, medium large) for reading messages. Take the time
to select a font that is easy for YOU to read.
|
| Sorry Private |
January 8, 2002 |
|
 |
| Internet Explorer Privacy
Tab |
In the previous tip we showed how to enable/disable AutoComplete
for Web addresses, forms, and passwords.
Another area that you can control is Cookies. You can limit
who can leave cookies on your computer. Cookies are small files
that Web sites leave on your computer and can be later read
by the site or whoever left the cookie. One big problem with
cookies is that 3rd parties such as DoubleClick.com also leave
cookies on your computer so they can track your travel through
the web.
The Privacy tab gives you the ability to restrict who can leave
cookies on your computer and also restrict or block the use
of personal identifiable information. We set the privacy level
to Medium. We may try Medium High. The higher you set your privacy
the greater the risk that Web sites will restrict your ability
to visit the site.
|
| AutoComplete Equals Hacker's
Delight |
January 7, 2002 |
|
 |
| Internet Explorer 6.0
AutoComplete options. |
The AutoComplete feature saves previous entries you've made
for Web addresses, forms, and passwords. Then, when you type
information in one of these fields, AutoComplete suggests possible
matches. Internet Explorer 5.5/6.0 Help
Saves passwords? No way. To make sure Internet Explorer 5.5/6.0
isn't saving passwords go to Tools >> Internet Options
>> Content tab and click the AutoComplete
button. Check those options that you want to make available
to the happy hackers of the world.
You can also clean out the Forms and Password
histories. Do it! Frequently.
|
| Screen Saver Is Bliss |
January 4, 2002 |
|
 |
| Bliss Screen Saver |
Remember when you were a kid, lying on your back in a big
grassy field and watching the clouds roll by? It was pure Bliss.
Gee, for me Grassy Field brings back memories of the
60's. Oh well, each to his own Bliss. For the purely digital
kind in the form of a screen saver click over to Microsoft and
get the Bliss
screen saver. Happy Dreams.
|
| Microsoft & Security |
January 3, 2002 |
|
| Microsoft is trying. How
hard is the big question. Anyway here is a starting
point. From here you can jump to Windows Update or get security
patches. Also check out the section called 'What do I need
to now about ...' Remember: It all comes down to You. |
| Windows Key Shortcuts |
January 2, 2002 |
|
|
Do you have a Windows key on your keyboard (it has the flying
window logo on it)? Here are some keyboard combos that may
come in handy:
Press:
- Windows-E to open Windows Explorer
- Windows-F to open Find
- Windows-M to minimize all open windows (or Shift-Windows-M
to undo this command)
- Windows-R to open the Run window
- Windows-F1 to open Help
- Windows-L to log off
- Windows-Tab to cycle through the Taskbar buttons
- Windows-Break to open the System Properties dialog box
- Windows-D to display the desktop (press it again to get
your windows back.
|
|
|