| Details Everywhere 2 |
December 28, 2001 |
|
 |

|
| Details
view with Tasks Sidebar. |
Details
of your files and folders in Tasks sidebar. |
You can also view file details from the new Explorer Bar (sidebar) called
Tasks.
This Taskbar has three basic task: File
and Folder Tasks, Other
Places Tasks, and Details
Tasks.
|
| Details Everywhere 1 |
December 27, 2001 |
|
 |
| Pop-Up Information |
In our previous tip we showed how to
view additional file details from Windows Explorer. You can also
view the details form any Windows Explorer view. If no details
are present, like with Icons view, the details can still be
viewed by holding your pointer over a file in question and in a
short moment the file's details
will popup.
|
| Expanded Details Available |
December 26, 2001 |
|
|
With previous versions of Explorer there were only four details
available. With the Windows XP Explorer many more are available.
If you're using Microsoft applications exclusively then you'll
love all the new details for your viewing pleasure. To select
details go to View -> Choose
Details. Then just check the details you require. Note:
Changes affect the current folder only.
For more information about the Windows
XP Windows Explorer go
here.
|
| Locating Icon Files |
December 21, 2001 |
|
|
Recently, we showed you how to change
the icon used to represent the My Computer, My Documents,
My Network Places and Recycle Bin items on your desktop,
or any shortcut. Don't like the choices you see after clicking
the Change Icon button? Finding other choices is a bit tricky,
but worth the effort.
Click Browse, and you're presented with a dialog box
(supposedly) full of icon files. Unfortunately, files that actually
contain icons are hard to identify (other than those you can
see right in the file list). So you can do one of two things:
Select them one at a time and click Open to see what's
inside; or go directly to one of these two files -- C:\WINDOWS\SYSTEM32\pifmgr.dll
or C:\WINDOWS\SYSTEM32\shell32.dll -- and save yourself
the trouble!
Once you know the icon file you're after, navigate your way
to that file, click Open, select an icon and click OK.
Click OK one more time to close the Properties dialog
box.
|
| Make Your Own Restore Point |
December 20, 2001 |
|
|
By default, restore points are created at regularly scheduled
times, or before certain programs are installed. But you can
also create your own. If you're about to make some substantial
changes to your system, you may want to create a restore point,
so you can go back if something go wrong.
To create a restore point, select Start -> All Programs
-> Accessories -> System Tools -> System Restore.
Select Create a Restore Point and click Next.
Type a restore point description, then click Create.
Once the new point is created, click Close to exit the
wizard or Home to create another.
|
| Ctrl-Tab To Rotate Through Tabs |
December 19, 2001 |
|
| If you're in a dialog box
that includes multiple tabs -- for example, the Display Properties
dialog box -- you know that you can move from one to the next
by clicking that tab with the mouse. But did you also know that
you can rotate through tabs using your keyboard? Press Ctrl-Tab
to switch to the next tab, or Ctrl-Shift-Tab to move to
the previous tab. |
| Stick A Pin In Those Balloon
Tips |
December 18, 2001 |
|
 |
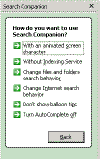 |
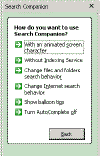
| [above]
To show the Balloon tips go to Search Preferences
and double-click Show Balloon tips. |
[above]
To hide Balloon Tips go to Search Preferences and
double-click Don't show Balloon tips. |
One of the more irritating helpful ideas
within Windows XP are those Balloon Tips. Balloon tips
pop-up EVERY time you try to do anything. Is there anything
you can do at the Start menu that won't bring up a balloon tip?
Probably not. Well we finally found the source. Believe it or
not we had to go to the Search utility [F3] and double-click
Search Preferences. Now just click on Hide Balloon
tips. That's it. To show Balloon tips just click Show
Balloon tips.
|
| Screen Saver To Welcome |
December 17, 2001 |
|
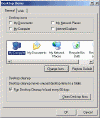 |
| [above]
The Customize Desktop pane. |
In the previous
tip we explained how to enable/disable standby modes
from going to the Welcome screen prior to resuming. Now we will
help Mr. Pournelle stop Windows from displaying the
"You have unused icons on your desktop" message
from appearing.
Hint: We already showed the window
that has this option in a previous tip. You remember which one?
The tip was about changing icons.
Review the tip to learn where you can disable the above message.
In short we pop-up the Properties
pane for the Desktop and select the Desktop tag.
Then we click on the Customize Desktop button. Now we
can uncheck the Desktop cleanup option.
|
| Screen
Saver To Welcome |
December 14, 2001 |
|
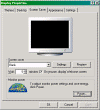 |
| [above]
Screen Saver tab |
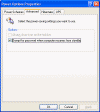 |
| [above]
Screen Saver -> Power Options |
In the December 3, 2001 issue of Chaos
Manor Jerry Pournelle encountered a feature he wanted to
disable but didn't know how. I'll let Jerry explain the feature:
Some "features" I could do without. Whenever the
Home Edition machine goes to sleep, waking it shows the desktop
for a moment — then I am taken to a screen with several user
icons, and required to choose one. This doesn't take long
but it's annoying as anything. If I want to log in as a different
user I will tell the silly machine: It doesn't have to make
me choose every time. I suspect there's a way to change this
"feature" but I haven't found it.
Chaos Manor, Dec 3, 2001
Basically what he is encountering is
Screen Saver displaying the Welcome screen whenever
you wake-up Windows. To disable this feature pop-up the
Desktop shortcut-cut menu and select Properties
(that Big Tip again.) Now click on the
Screen Saver tab and uncheck On resume, display Welcome
screen. Each account has this option.
Wait, there's more. You also have the
option of displaying the Welcome screen whenever the
system resumes from a power standby. Only Administrator
accounts can change this option. This means it will affect all
accounts. To disable this feature pop-up the Desktop
shortcut-cut menu and select Properties (that Big
Tip again.) Now click on the Screen Saver tab, click
the Power button, and select the Advanced tab
and uncheck Prompt for password when computer resumes from
standby.
editor's note: Mr. Pournelle
is always complaining that Microsoft ignores security and here
is a security feature and now Mr. Pournelle is complaining about
Microsoft's security features. Can't have it both way Mr. Pournelle.
|
| Changing
Icons |
December 13, 2001 |
|
 |
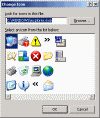 |
| [above]
The Customize Desktop pane. |
[above]
The Change Icon pane. |
Yesterday I mentioned a search query: change
start menu icons. I stated I couldn't find a way to change
Start Menu Icons. Well I did. While researching the tip
I planned for today I came upon a way to change some of the Icons.
From the shortcut menu for the desktop select Properties.
[remember the Big Tip] Select the
Desktop tab. Now click the Customize Desktop button.
Now just select an Item and click the Change Icon
button. Select the desired Icon and click OK. |
| The Big
Tip: Shortcut Menu, Properties |
December 12, 2001 |
|
|
Looking through the list of recent searches
at Windows Assistance was this item: change start
menu icons. Well I went to the Start menu and tried to change
the Icons. I couldn't. But I did realize that I always did my
investigations in a similar manner. That procedure became the
Big Tip.
Here's the Big Tip: Whenever
you are trying to figure out what you can do with a certain
item, such as change it's Icon, you only have to pop-up the
shortcut menu for that item and select Properties.
That's it. Shortcut Menu. Properties. If you never, ever
remember anything else you have learned about Windows never,
ever forget this tip. I'll repeat it for you: Shortcut
menu, Properties.
Right about now you are saying to yourself:
Self, what is a shortcut menu? Just so happens
Windows Assistance has a page just on the shortcut
menus. Enjoy!
|
| What Works With Windows XP |
December 11, 2001 |
|
| Find the products that
work best with Windows XP. Windows
Catalog showcases the hardware devices, software programs,
and computers that work best with Windows XP. From cameras
and printers to games and anti-virus software, Windows
Catalog lets you browse the best products available for
Windows XP. |
| Virus Protection In Outlook Express
6 |
December 10, 2001 |
|
|
Microsoft added a security setting to
Outlook Express 6: Do not allow attachments to be
saved or opened that could potentially be a virus. Instruction
on using this security setting in Outlook Express 6 review this
document: Using
Virus Protection Features in Outlook Express 6.
Windows Assistance found that
Outlook Express 6 as part of Windows XP Professional
has this security option enabled. But be on the safe side and
check for yourself. Go to Tools -> Options -> Security
and verify Do not allow attachments to be saved or opened
that could potentially be a virus is checked.
Important: If you forward
a message with a blocked attachment then you will be
able to open or save the attachment. It is important
for users to recognize that grayed-out attachments are not safe
to be opened and, users should be deleting, not forwarding an
email with a grayed-out attachment.
|
| Is Your Information Safe Online? |
December 7, 2001 |
|
| Test
your potential privacy perils. In a super-connected world
where e-mail can be sent while taking a rush-hour cab ride, deals
can be clinched during cocktail hour with computer in hand, and
courting is condoned via chat room, you need to know that the
info you send and receive online is safe. Microsoft has put up
this short multiple choice questionnaire to determine the level
of online security that fits your computing habits and personality.
|
| User Account Equals Limited Access |
December 6, 2001 |
|
|
As we explained in our last tip Users
should have limited access to the Windows XP system. When you
installed Windows XP the default account type is Administrator.
Administrator accounts has access to everything. Your first
task after installing Windows XP is to create a User with limited
access. See past tips on adding
user accounts and the administrator
accounts.
In short - never browse the Internet
with an Administrator account. Always use a firewall product.
For many users ZoneAlarm from Zone
Labs works well. And always use a anti-virus utility.
|
| User Mode To Browse The Internet |
December 5, 2001 |
|
| Never browse the Internet
as Administrator. Always sign-on as a standard user with limited
rights. These limited rights exclude modifying any part of the
Windows XP system. This will add an extra layer of security while
you are open to the world. It will also prevent any virus from
modifying Windows XP. |
| Home or Pro Tips |
December 4, 2001 |
|
|
One of the problems with Windows XP
is creating tips that work with both versions of the OS. Having
both Home and Professional versions running on separate machines
just to verify a tip will work on both is not in the works at
Windows Assistance.
For a list of tips for the Home
edition check this page at Microsoft. Microsoft has
no tips page for the Professional edition but it does have a
page of accessibility
tips just for the Pro edition. I suspect that most, if not
all, of the Pro accessibility tips apply to the Home edition
as well.
Then there are the Windows XP tips
at the Windows XP Expert
Zone.
|
| Run As ... |
December 3, 2001 |
|
|
In the previous tip we explained how
to disable Narrator whenever you start Utility Manager.
If you noticed our example the option to disable Narrator
was grayed (itself disabled.) In short you couldn't disable
Narrator.
But wait there is a way and you can do
it right from the current user. The problem is you need Administrator
rights to disable Narrator. If the current user doesn't
have Administrator rights but does know the username
and password for the Administrator then you can start
Utility Manager using the Run As command and sign-on
with as user that has Administrator rights.
Go to the Utility Manager
shortcut in the All Programs Menu. Right-click Utility
Manager and from the shortcut menu select Run As.
Select the user with Administrator rights and input the
correct password. Once the Utility Manager loads you
will be able to disable narrator.
|
| November
2001 |