|
Whenever you read how to improve the performance of your
computer the most common method is to add more memory. And
they are correct. It's the cheapest and easiest way to speed
up your computer. The one method rarely, if ever, discussed
is adding a second disk drive. If they do mention the disk
drive they don't tell you how to best use that second drive.
The basic idea is to distribute the load over the two disk
drives. The idea here is to take the two most active functions
and put them on separate disk drives. We at WindowsAssistance
have no hard (pun intended) data for how we decided to split
up the disk drives but it does work. The method we will discuss
is use by WindowsAssistance on it's computers.
Beware
In order to apply the methods we will discuss here you will
have to reload applications and transfer data. This may not
be easy for you and therefore we recommend you get a geek
friend to help you. This is not rocket science but it does
take a little understanding of the process and the requirement
to get into the computer box to installed your new second
disk drive. Read this article first before you do anything.
If any part of the procedure is confusing then either e-mail
WindowsAssistance
and ask us or get that geek friend to explain.
The primary disk drive or C: is where Windows is located.
The second disk drive has everything else: applications, data,
virtual memory, and temporary directories.
The C: drive
Currently your C: drive is the only disk drive you have in
your computer. If not you still need to set it up properly.
The only thing you will install on the C: drive is Windows.
To make the change over easier leave your applications on
the C: drive. Later you may wish to move them to your second
drive.
The Second Disk-Drive
The second disk drive needs to be divided into 3 partitions.
Partition 1 is for applications. Partition 2 is for data only.
Partition 3 will have the swapfile or virtual memory and the
temporary directories. How many partitions you use is up to
you but it is a must that the swapfile or virtual memory have
it's own partition. The only additional usage for this partition
would be the temporary directories.
We do recommend a separate partition for all your data. Why?
Easier to find and much easier to backup. And if more than
one person is using the computer then create a partition for
each user.
Defragmenting Only What's Needed
One advantage to separate partitions is during cleanup when
you need to run ScanDisk and defragment your disk drives.
If your applications are on a separate partition that partition
generally never needs to be defragmented. The partition with
the swapfile or virtual memory is never defragmented. And
the partition with your data need only occasionally be defragmented.
The only place where defragmenting is needed on a regular
bases is the operating system. So if your applications, data,
and virtual memory are located somewhere else a great amount
of time is saved by just defragmenting the Windows operating
system itself. A 6 or 8 Gigabyte disk drive can be defragmented
MUST faster than a 40 GigaByte disk drive.
The Big Time Saver
The primary reason for the second disk drive is to move the
swapfile or virtual memory off the same disk drive as the
operating system. Why? Because the operating system and the
virtual memory are the two most accessed areas. If they are
both are on the same disk drive then only one area can be
access while the other waits. If the two are on separate disk
drives then while one is reading data off it's disk drive
the other can be locating data. Both operations, reading and
seeking, going on at the same time. More efficient and faster.
Moving Virtual Memory To The Second Disk
Moving data over to it's own partition involves copying the
data. Moving your applications involves un-installing then
installing on the second disk drive. Remember - use separate
partitions for data and applications. Setting up your virtual
memory on the new second drive involves going to your system
properties. Here's how.
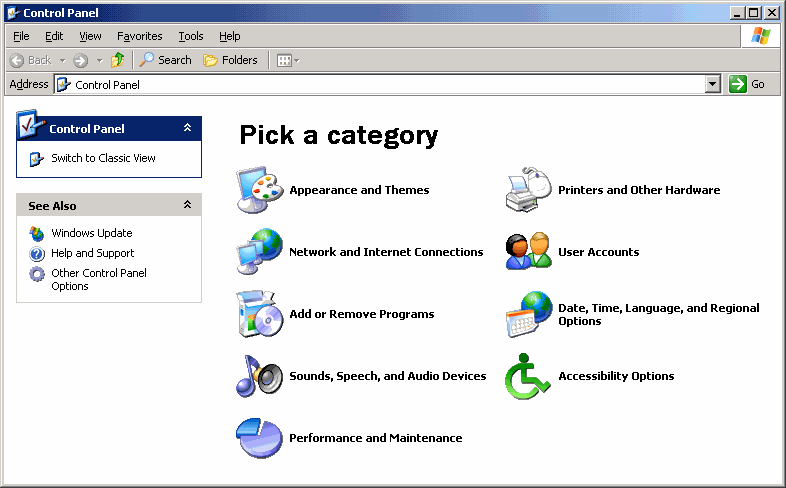
From the Control
Panel --> Performance and Maintenance --> System
--> Advanced tab --> Performance section --> Settings
--> Advanced tab --> Change.
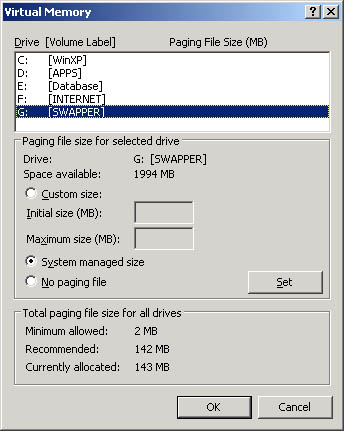
Except for the partition being used for the swapfile or virtual
memory they all should be set for No Paging File (see
figure 2.)
We also recommend that you allow Windows to manage the size
of virtual memory (see figure
3.)
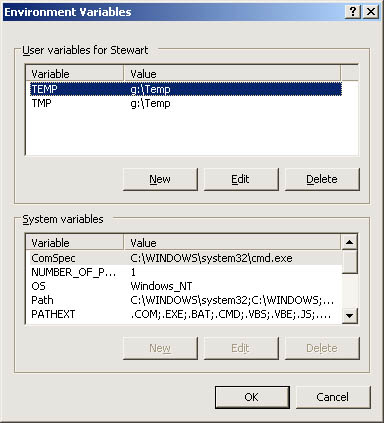
Temporary Directories
Another option is to use the same partition as your virtual
memory for your temporary directories. Their are system temp
and Internet Explorer temp locations.
For the system temp directories go to: Control
Panel --> Performance and Maintenance --> System
--> Advanced tab --> Environmental Settings (see
figure
4.) Change both the Temp and Tmp variables
to use the same partition as your virtual memory.
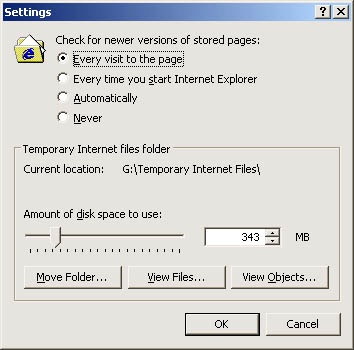
Additional option is to use the virtual memory partition
to store Internet Temporary Files. From Internet Explorer:
Tools menu --> Internet Options --> Temporary Internet
Files: Settings --> Move Folder. (see figure
5.)
Lastly - System Backup
WindowsAssistance recommends that System Backup be disabled
for all partitions except for C:. That's because the operating
system is the only thing that needs to be backed up. Again
having multiple partitions will save you a lot of space and
time.
To change System Backup go to Control
Panel --> Performance and Maintenance --> System
--> Advanced tab
-30-
|